Debian 12 只安装VNC及i3桌面,就可以低成本的实现远程桌面环境
# 安装通用工具
apt-get install -y nano net-tools bzip2 procps apt-utils iputils-ping netcat-openbsd
# 安装中文字体
apt-get install -y locales fonts-wqy-microhei fonts-wqy-zenhei xfonts-wqy && \
    sed -i -e "s/# zh_CN.UTF-8 UTF-8/zh_CN.UTF-8 UTF-8/" /etc/locale.gen && \
    locale-gen zh_CN.UTF-8 &&\
    update-locale LANG=zh_CN.UTF-8 LANGUAGE=zh_CN:zh LC_ALL=zh_CN.UTF-8
# 安装VNC
apt-get install -y tigervnc-standalone-server
# 安装i3桌面
apt-get install -y i3-wm i3status i3blocks dmenu xfonts-base terminator dbus-x11 libdbus-glib-1-2 ; apt-get purge -y pm-utils *screensaver*

apt-get clean
~/.config/i3/config
# This file has been auto-generated by i3-config-wizard(1).
# It will not be overwritten, so edit it as you like.
#
# Should you change your keyboard layout some time, delete
# this file and re-run i3-config-wizard(1).
#

# i3 config file (v4)
#
# Please see https://i3wm.org/docs/userguide.html for a complete reference!

set $mod Mod1

# Font for window titles. Will also be used by the bar unless a different font
# is used in the bar {} block below.

# This font is widely installed, provides lots of unicode glyphs, right-to-left
# text rendering and scalability on retina/hidpi displays (thanks to pango).
#font pango:DejaVu Sans Mono 8
font pango:monospace 8

# Start XDG autostart .desktop files using dex. See also
# https://wiki.archlinux.org/index.php/XDG_Autostart
# exec --no-startup-id dex --autostart --environment i3

# The combination of xss-lock, nm-applet and pactl is a popular choice, so
# they are included here as an example. Modify as you see fit.

# xss-lock grabs a logind suspend inhibit lock and will use i3lock to lock the
# screen before suspend. Use loginctl lock-session to lock your screen.
# exec --no-startup-id xss-lock --transfer-sleep-lock -- i3lock --nofork

# NetworkManager is the most popular way to manage wireless networks on Linux,
# and nm-applet is a desktop environment-independent system tray GUI for it.
# exec --no-startup-id nm-applet

# Use pactl to adjust volume in PulseAudio.
# set $refresh_i3status killall -SIGUSR1 i3status
# bindsym XF86AudioRaiseVolume exec --no-startup-id pactl set-sink-volume @DEFAULT_SINK@ +10% && $refresh_i3status
# bindsym XF86AudioLowerVolume exec --no-startup-id pactl set-sink-volume @DEFAULT_SINK@ -10% && $refresh_i3status
# bindsym XF86AudioMute exec --no-startup-id pactl set-sink-mute @DEFAULT_SINK@ toggle && $refresh_i3status
# bindsym XF86AudioMicMute exec --no-startup-id pactl set-source-mute @DEFAULT_SOURCE@ toggle && $refresh_i3status

# Use Mouse+$mod to drag floating windows to their wanted position
floating_modifier $mod

# move tiling windows via drag & drop by left-clicking into the title bar,
# or left-clicking anywhere into the window while holding the floating modifier.
tiling_drag modifier titlebar

# start a terminal
bindsym $mod+Return exec i3-sensible-terminal

# kill focused window
bindsym $mod+Shift+q kill

# start dmenu (a program launcher)
bindsym $mod+d exec --no-startup-id dmenu_run
# A more modern dmenu replacement is rofi:
# bindcode $mod+40 exec "rofi -modi drun,run -show drun"
# There also is i3-dmenu-desktop which only displays applications shipping a
# .desktop file. It is a wrapper around dmenu, so you need that installed.
# bindcode $mod+40 exec --no-startup-id i3-dmenu-desktop

# change focus
bindsym $mod+j focus left
bindsym $mod+k focus down
bindsym $mod+l focus up
bindsym $mod+semicolon focus right

# alternatively, you can use the cursor keys:
bindsym $mod+Left focus left
bindsym $mod+Down focus down
bindsym $mod+Up focus up
bindsym $mod+Right focus right

# move focused window
bindsym $mod+Shift+j move left
bindsym $mod+Shift+k move down
bindsym $mod+Shift+l move up
bindsym $mod+Shift+semicolon move right

# alternatively, you can use the cursor keys:
bindsym $mod+Shift+Left move left
bindsym $mod+Shift+Down move down
bindsym $mod+Shift+Up move up
bindsym $mod+Shift+Right move right

# split in horizontal orientation
bindsym $mod+h split h

# split in vertical orientation
bindsym $mod+v split v

# enter fullscreen mode for the focused container
bindsym $mod+f fullscreen toggle

# change container layout (stacked, tabbed, toggle split)
bindsym $mod+s layout stacking
bindsym $mod+w layout tabbed
bindsym $mod+e layout toggle split

# toggle tiling / floating
bindsym $mod+Shift+space floating toggle

# change focus between tiling / floating windows
bindsym $mod+space focus mode_toggle

# focus the parent container
bindsym $mod+a focus parent

# focus the child container
#bindsym $mod+d focus child

# Define names for default workspaces for which we configure key bindings later on.
# We use variables to avoid repeating the names in multiple places.
set $ws1 "1"
set $ws2 "2"
set $ws3 "3"
set $ws4 "4"
set $ws5 "5"
set $ws6 "6"
set $ws7 "7"
set $ws8 "8"
set $ws9 "9"
set $ws10 "10"

# switch to workspace
bindsym $mod+1 workspace number $ws1
bindsym $mod+2 workspace number $ws2
bindsym $mod+3 workspace number $ws3
bindsym $mod+4 workspace number $ws4
bindsym $mod+5 workspace number $ws5
bindsym $mod+6 workspace number $ws6
bindsym $mod+7 workspace number $ws7
bindsym $mod+8 workspace number $ws8
bindsym $mod+9 workspace number $ws9
bindsym $mod+0 workspace number $ws10

# move focused container to workspace
bindsym $mod+Shift+1 move container to workspace number $ws1
bindsym $mod+Shift+2 move container to workspace number $ws2
bindsym $mod+Shift+3 move container to workspace number $ws3
bindsym $mod+Shift+4 move container to workspace number $ws4
bindsym $mod+Shift+5 move container to workspace number $ws5
bindsym $mod+Shift+6 move container to workspace number $ws6
bindsym $mod+Shift+7 move container to workspace number $ws7
bindsym $mod+Shift+8 move container to workspace number $ws8
bindsym $mod+Shift+9 move container to workspace number $ws9
bindsym $mod+Shift+0 move container to workspace number $ws10

# reload the configuration file
bindsym $mod+Shift+c reload
# restart i3 inplace (preserves your layout/session, can be used to upgrade i3)
bindsym $mod+Shift+r restart
# exit i3 (logs you out of your X session)
bindsym $mod+Shift+e exec "i3-nagbar -t warning -m 'You pressed the exit shortcut. Do you really want to exit i3? This will end your X session.' -B 'Yes, exit i3' 'i3-msg exit'"

# resize window (you can also use the mouse for that)
mode "resize" {
        # These bindings trigger as soon as you enter the resize mode

        # Pressing left will shrink the window’s width.
        # Pressing right will grow the window’s width.
        # Pressing up will shrink the window’s height.
        # Pressing down will grow the window’s height.
        bindsym j resize shrink width 10 px or 10 ppt
        bindsym k resize grow height 10 px or 10 ppt
        bindsym l resize shrink height 10 px or 10 ppt
        bindsym semicolon resize grow width 10 px or 10 ppt

        # same bindings, but for the arrow keys
        bindsym Left resize shrink width 10 px or 10 ppt
        bindsym Down resize grow height 10 px or 10 ppt
        bindsym Up resize shrink height 10 px or 10 ppt
        bindsym Right resize grow width 10 px or 10 ppt

        # back to normal: Enter or Escape or $mod+r
        bindsym Return mode "default"
        bindsym Escape mode "default"
        bindsym $mod+r mode "default"
}

bindsym $mod+r mode "resize"

# Start i3bar to display a workspace bar (plus the system information i3status
# finds out, if available)
bar {
        status_command i3status -c $HOME/.config/i3/status.conf
}

# exec_always $HOME/chrome-startup
~/.config/i3/status.conf
# 安装 Podman
apt update \
&& apt install -y curl gpg gnupg2

# 查看 Debian版本
lsb_release -a

# Debian 13
# 添加 Kubic 项目的 Debian_Testing 软件源
echo 'deb http://download.opensuse.org/repositories/devel:/kubic:/libcontainers:/stable/Debian_Testing/ /' | sudo tee /etc/apt/sources.list.d/kubic.list
# 下载并添加对应的 GPG 密钥
curl -fsSL https://download.opensuse.org/repositories/devel:kubic:libcontainers:stable/Debian_Testing/Release.key | gpg --dearmor | sudo tee /etc/apt/trusted.gpg.d/kubic.gpg > /dev/null

# 更新软件包列表并安装 Podman
apt update \
&& apt install -y podman \
&& podman version

# 安装 podman-compose
apt install -y pipx \
&& pipx ensurepath \
&& . ~/.bashrc \
&& pipx install podman-compose \
&& podman-compose version

# iptables必须安装,否则netavark无法运行
apt install -y iptables
# 防火墙一定要加这条,否则容器之间的名称解析无法工作
iptables -A INPUT -p udp -m udp --dport 53 -j ACCEPT
# nano /etc/containers/registries.conf
unqualified-search-registries = ["docker.io"]

[[registry]]
prefix = "docker.io"
location = "docker.io"
[[registry.mirror]]
location = "docker.1ms.run"
[[registry.mirror]]
location = "registry.cn-hangzhou.aliyuncs.com"

[[registry]]
prefix = "ghcr.io"
location = "ghcr.io"
[[registry.mirror]]
location = "ghcr.nju.edu.cn"
podman run --rm hello-world
其实命令与Docker一致,非常方便好用。
基于 CentOS 7
让Linux系统与Windows系统之间,支持机器名访问,需要Linux安装NetBIOS。 而安装NetBIOS,不一定必须安装Samba,安装过程如下:
# 注意 这里并不会安装完整的samba
$ yum install samba-winbind
; Nano /etc/nsswitch.conf
; add wins
hosts:  files <wins> dns myhostname
$ ll /etc/<lib|lib64>/libnss_winbind.so
$ ldconfig
$ systemctl start winbind
$ systemctl status winbind
; ~/.tmux.conf
# 启动鼠标支持
set -g mouse on
set -g mode-keys vi

# WindTerm需在 会话 --> 首选项 --> 设置 --> 终端 --> 鼠标追踪 --> 追踪事件
# 取消勾选:
# - 移动事件
# - 点击事件
# - 右键单击事件
# WindTerm使用鼠标修改面板大小,受WindTerm限制无法实现

# 禁用 WindTerm 的默认鼠标行为(防止冲突)
set -g terminal-overrides 'xterm*:smcup@:rmcup@'
# 1. 禁用左键释放自动复制(改为仅选择)
bind -T copy-mode-vi MouseDragEnd1Pane send-keys -X copy-selection-and-cancel
# 2. 右键复制已选文本(需先左键选择)
bind -T copy-mode-vi MouseDown3Pane send-keys -X copy-pipe-and-cancel \
  "xclip -i -selection clipboard 2>/dev/null || \
   pbpaste 2>/dev/null || \
   win32yank.exe -i 2>/dev/null"
# 3. 右键直接粘贴系统剪贴板内容(跨系统支持)
bind -n MouseDown3Pane run-shell \
  "tmux set-buffer -- \"$(xclip -o -selection clipboard 2>/dev/null || \
                          pbpaste 2>/dev/null || \
                          win32yank.exe -o 2>/dev/null)\"; \
   tmux paste-buffer"

# 解除默认的鼠标调整绑定(可选)
unbind-key -T root MouseDrag1Border
# 重新绑定鼠标拖动调整大小
bind -n MouseDrag1Border resize-pane -M

# status line
set -g status-justify centre
set -g status-left "#{session_name}"
set -g status-right "%F %R"
# 窗口编号自动重新排序
set -g renumber-windows on

# status line > window list
set -g window-status-format "#{window_index}:#{window_name}"
set -g window-status-separator " | "
set -g window-status-current-format "#{window_index}:#{window_name}"
set -g window-status-current-style bold,italics

# pane
set -g pane-border-format " #{pane_index}:#{pane_title} $ #{pane_current_command} "
set -g pane-border-status top
set -g history-limit 10000
# 更新配置,不需要关闭tmux,直接运行马上生效
tmux source-file ~/.tmux.conf
Prefix = Ctrl + b
Proxmox VE 官方提供的 Centos 7 模板是有问题的无法正常使用,现在给出解决方案。
安装完成后,容器可以启动,但无法关闭、网络无法使用、控制台无法使用,这些都是我们要解决的问题。
# 查看 CT 容器列表
$ pct list
# 进入 CT 容器
$ pct enter <VMID>
# 启动网络,从DHCP拿IP地址
$ ifup eth0
$ curl -o /etc/yum.repos.d/jsynacek-systemd-backports-for-centos-7-epel-7.repo https://copr.fedorainfracloud.org/coprs/jsynacek/systemd-backports-for-centos-7/repo/epel-7/jsynacek-systemd-backports-for-centos-7-epel-7.repo
$ yum update
# 安装 sshd
$ yum install -y openssh-server
$ systemctl start sshd.service
$ systemctl enable sshd.service
$ exit
$ pct stop <VMID>
NcFTP 是 Linux 上常用的 FTP客户端工具,非常好用,这里记录它的常见用法。
FTP浏览工具
$ ncftp
# 一定注意参数顺序
ncftp > open -u <username> -p <password> <remote-host>
# 使用被动模式传输
ncftp > set passive yes
ncftp > put <local-files>
FTP上传命令行工具
# 一定注意参数顺序
# 使用被动模式传输
$ ncftpput -u <username> -p <password> -F <remote-host> <remote-path> <local-files>
# or
$ ncftpput -f ftp.cfg -F <remote-path> <local-files>
; ftp.cfg
host ftp.server.com
user myusername
pass mypasswd
cat info.log error.log > merge.log.bak
cp merge.log.bak merge.log
安装 xrdp
$ sudo apt install xrdp
启动xrdp服务,并设置为开机启动
$ sudo systemctl start xrdp
$ sudo systemctl enable xrdp
解决黑屏/空屏/无画面
$ nano /etc/xrdp/startwm.sh
unset DBUS_SESSION_BUS_ADDRESS
unset XDG_RUNTIME_DIR
. $HOME/.profile
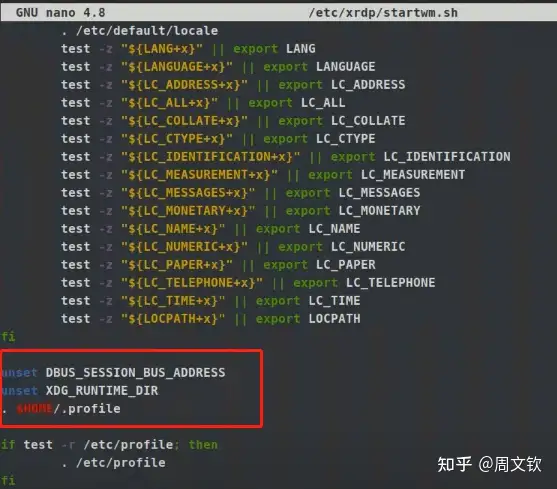
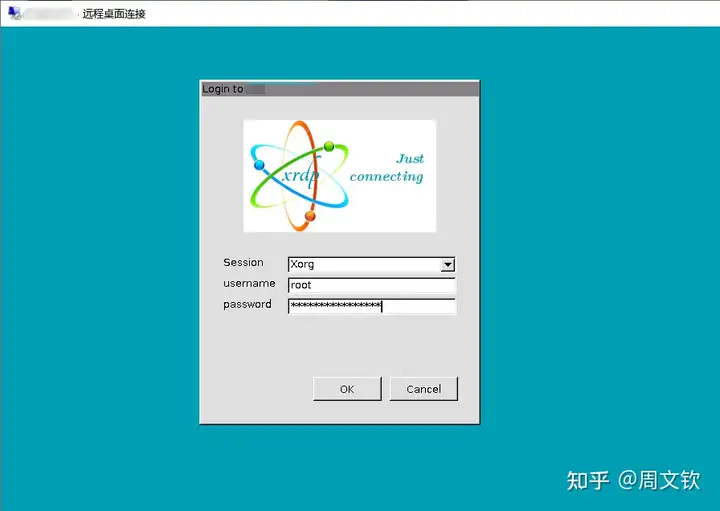
重启deepin,使用Xorg模式登录
Alpine Linux 原始安装的是 busybox,小巧精干,但毕竟与主流的 Bash 还是有区别,特别是与其它系统联动时会比较麻烦,所以还是安装 Bash,统一 Shell 环境,方便日后使用。
而且基本网上的安装教程都有问题,所以这里给出正确的安装步骤。
$ apk add bash libuser
$ touch /etc/login.defs
$ mkdir /etc/default
$ touch /etc/default/useradd
$ lchsh <root>
Changing shell for root.
Password: <root password>
New Shell [/bin/ash]: /bin/bash
Shell changed.
看完这3篇足以把服务建起来,非常方便
可直接使用 Docker 的配置进行
原本也想使用Docker镜像,但发现kvm之间通过Docker通信好像有问题,所幸在宿主机上可以直接使用release文件。 【注意:每次添加新的客户端,要同步更新服务端的端口配置】
官网下载地址【注意:s, c两端使用的版本号要相同】
$ cd ~
# 下载安装软件
$ yum install wget tar git
# 下载 frp
$ wget -c https://github.com/fatedier/frp/releases/download/v0.34.3/frp_0.34.3_linux_amd64.tar.gz
$ tar -axvf frp_0.34.3_linux_amd64.tar.gz
$ rm -rf frp_0.34.3_linux_amd64.tar.gz
# 下载 frp 配置
$ git clone https://github.com/Cuile/frp.git
# 此处只能使用硬链接,使用软链接会导致无法启动服务
# 安装配置文件
$ mkdir /etc/frp
$ ln -b ~/frp/conf/frpc-pve.ini /etc/frp/frpc.ini
# 安装运行文件
$ ln -b ~/frp_0.34.3_linux_amd64/frpc /usr/bin/frpc
# 安装服务
$ ln -b ~/frp_0.34.3_linux_amd64/systemd/frpc.service /lib/systemd/system/frpc.service
$ systemctl enable frpc.service           ##设定指定服务开机开启
$ systemctl disable frpc.service          ##设定指定服务开机关闭

$ systemctl start frpc.service
$ systemctl stop frpc.service
$ systemctl restart frpc.service

$ systemctl status frpc.service
$ systemctl list-units | grep frpc
通过 git 更新 frpc 的配置后,要重新链接配置文件